
Home made bread
More and more people are baking their own bread at home. There are many reasons for this, but the main ones are that you can use your own choice of ingredients and that homemade bread just tastes so much better than store-bought bread. Home-baked bread won’t have any of the chemicals or additives of store bought bread, and it won’t contain the ground remains of old bread like you can find in store-bought bread. Also, except for some small regional bakeries, you can’t buy bread made from sourdough starter in the store. Bread made from sourdough starter, instead of from yeast, has better flavor, aroma, and health benefits.
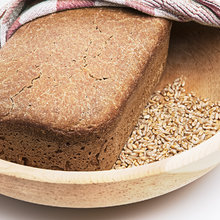
The benefits of sourdough bread
Bread is a basic and universal food. It’s often eaten at breakfast, given as a snack for children, and eaten as a side dish with many meals. White bread has virtually no health benefits, and actually can lead to many health problems (read http://www.smartbreadmaker.com/10-surprising-health-hazards-found-in-bread.html{popup}) On the other hand, most people prefer the rich taste of bread made from whole grains. Whole grain bread not only tastes better, but it is very nutritious, higher in fiber, is more filling, and cleans out the digestive system. The best whole grain bread is made from sourdough starter, instead of from commercially available yeast deco:/storage/img/%size%/732-depositphotos_10907663_original-kopie.jpg:640 dom%C3%A1c%C3%AD pek%C3%A1rna Sana Smart Bread Maker]
What are some benefits?
- Smells and tastes much better – even to those who prefer white bread.
- Provides the body with vitamins, minerals, high quality complex carbohydrates, healthy fats and fiber.
- Cleans the intestines and improves digestion. It also lowers acid levels in the small intestine, which can be a breeding ground for many types of serious diseases and can cause body chemistry changes which can lead to mood swings.
- Unlike white bread, wholegrain bread does not affect the immune system.
- Does not clog blood like processed white bread. In fact, it is a valuable building material for the formation of new blood cells. Pure blood keeps you fresh and healthy.
- Helps prevent lifestyle diseases such as diabetes, high blood pressure or Alzheimer's disease.
- Contains an increased amount of potassium and less sodium, thereby preventing water retention and the subcutaneous deposit of fat. It helps in to prevent obesity.
- Reduces the possibility of developing a gluten allergy or celiac disease.
- Stays fresh longer (Up to seven days when properly stored in a cool towel).
The advantages of baking bread in the Sana Smart Bread Maker
- Flexibility: You can make virtually any kind of bread, according to your tastes. You can use your own recipe, a store-bought mix, use yeast or sourdough starter, different types of flours, and mix in whatever extras you like (such as onions, raisins, dried tomatoes, potatoes, etc.)
- Bread without preservatives and other additives.
- Easy to use – the machine does all the kneading, rising, and baking
- Make your own sourdough starter in the Smart Bread Maker
- Multi-phase rising and baking ensures the best aroma and taste.
- Fully-adjustable programs, with the ability to modify or make your own custom programs.
- Saves energy compared to using an oven for bread making. Baking bread in the Sana Smart Bread maker uses about 20% of the energy of baking in a conventional oven.
- It is much cheaper to bake your own bread compared to buying it at the store
- Taste: The bread you bake yourself is not only healthier, but also tastes far better than anything you can buy at the store. Once you try it, you’ll never want to go back!

The Sana Smart Bread Maker is currently the only bread machine in the European market specializing in preparing and baking whole grain bread from sourdough starter.
Tips for your first time baking bread
- To ensure the best start to your baking experience, we recommend choosing a recipe which uses bread flour or whole wheat flour. You can also try a combination of wheat and rye flour, just make sure to keep wheat as the main ingredient, since baking bread with 100% rye flour is challenging, and beginners often fail. It’s best to work your way up to using 100% rye flour
- It is best to start with a smaller rather than larger loaf
- The first time you try any new recipe, make sure to monitor the temperature of the bread as it bakes. Using a needle thermometer, check the temperature from time to time until it reaches 95 C. At that point your bread is done. After that, you’ll know the details of a particular recipe and won’t have to monitor the temperature every time. For example, you will know that „Grandma’s Bread“ recipe takes one and a half hours to bake 800 grams. After this, you can program the Smart Bread Maker to remember this recipe. Remember that the time it takes to bake bread depends on several factors including the amount of flour used, the type of flour, the baking temperature, and whether or not you use an energy efficient glass lid, which will shorten baking time
- Don’t worry if your first try results in failure. Even improperly-cooked or damaged bread that you make yourself is tastier than what you can buy in a store. Some common problems faced by beginners are listed in the SmartBreadMaker manual, along with the solutions for those problems. You can also contact us if you need help or advice with your bread. You can use the email or phone contact information found on our website, or use our forum discussion forum
- To ensure success with your first try, you can sign up for one of our baking classes courses baking bread.
How to begin and grow sourdough starter (leaven)
It takes about 5 days to establish a long-lasting sourdough starter, and takes about 5 minutes a day to maintain. It’s simple and easy to do.
Prepare a large jar (0.7 l) and any flour, preferably rye (whole grain or bread flour). If you follow a gluten-free diet, use cornmeal, buckwheat or millet flour. The process of making sourdough starter is the same no matter which flour is used.
Making your sourdough starter
 Day 1: Put 60g of flour and 75 ml of lukewarm water into the jar. Cover with a light cloth, or put the jar lid on loosely, and let it stand at room temperature. Do glasses give 60 g of flour and stir in 75 ml of lukewarm water. Cover with a cloth or loose laid dry the lid and let stand at room temperature until the next day. Alternatively, if you obtained a piece of already-made sourdough starter, put it in a jar and let it ferment for 24 hours at 26-28 ° C
Day 2: Stir, then add 30 g of flour and 75 ml of lukewarm water. Mix it again. The mixture will be noticeably thinner.
Day 3 and 4: Stir, then add 30 g of flour and 35 ml of water. Before covering it give it a good stir.
Day 5:Your sourdough starter is done. You’re ready for baking!
Some things to look out for while preparing your sourdough starter: By the second day, the mixture should appear slightly bubbly, and have a slightly sour aroma, similar to champagne. If it has a strong acetone of rancid vinegar smell, throw it out and start again. On the third day it should begin to rise. Don’t worry if it later falls – this is natural.
Growing and maintaining the leaven
If you use our recipe below, not all the leaven is used. Just add each day about 30g of flour and 35 ml of water to the sourdough, and keep adding the same amount each day until you have enough for your next loaf. If you want to make another loaf sooner, add up to 100 g of flour and 125 ml of lukewarm water the first day, and then up to 50 g of flour and 60 ml of lukewarm water the second day, depending on how much you need. If you don’t want to use it right away, it will keep in the refrigerator for up to a week. If you want to keep it longer, add 2 tablespoons of rye flour. When you are ready to use it, take it out of the fridge and let it adjust to room temperature. After a day, it will rise and fall, at which time it is ready for baking. Alternatively, you can at this time continue adding flour and water as previously described. Even if your starter has become dry, you can reactivate it by adding flour and water.

Basic Sourdough Bread
Ingredients
120 g sourdough
600 g whole wheat flour
400 g of water
6 g salt
2 teaspoons cumin
3 tablespoons oil (olive, sunflower, sesame, flax ...)
Instructions:Put the kneading blades into the Sana bakery. Add in order the water, flour, sourdough, oil, cumin, and salt. Put the baking pan into the Smart Bread Maker. Set the program for kneading, rising, and baking according to the instruction manual. The program will vary depending on if you are using the model with energy-saving lids. During the mixing phase, use a wooden spatula to push any flour that has accumulated on the inside walls back into the dough. After the mixing phase, remove the kneading paddles and smooth the dough with moistened hands. Close the lid and the program will continue. When the bread is done, an audible signal will sound. Use a needle thermometer to check the temperature of the loaf. If it reaches 95 ° C, the bread is done. Take the baking pan out, and let it cool at least 30 minutes before removing the bread from the pan.

Other suggestions
- Store your bread in a towel, not in a paper or plastic bag. Bread wrapped in a light towel will stay fresh longer, will not get a hard crust, and will be less likely to mold. Store it in a cool place.
- Bread can be frozen without losing its flavor, aroma, and nutritional value.
- Make sure to eat bread slowly and chew thoroughly to prevent gas or bloating
- If you can’t eat the entire loaf over a few days, slice what is left and dry it to use later as croutons or breadcrumbs.